This puzzle is not for everyone, because it is quite difficult and time consuming. I enjoy sitting down and solving it all at once in about an hour, or doing it about 5 minutes at a time over a few days while taking breaks at work.
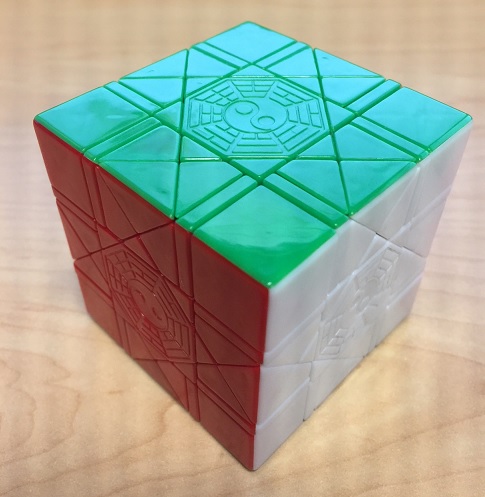
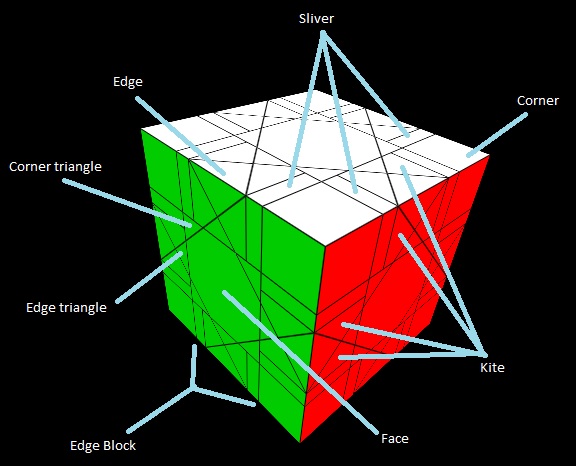
The solve steps given here will make use of the following naming conventions for the parts of the puzzle.
Up to the sliver peices, get it back into cube shape. In other words, it would be a perfect cube save some sliver peices may be gently poking out the sides of the cube. This just takes a lot of time and patience depending on how bandaged the puzzle has become. Think about the Rubik's cube sequences you already know and how they can help.
The sliver peices are now all that remain in terms of resolving the cube-shape of the puzzle.
There can be one or two mis-oriented slivers per edge block. When there are two, they can poke out the same or opposite sides of the block.
The former case is desired and the latter case is quite bandaging, so separate them whenever you can. Pair all the mis-oriented slivers so
that they reside on the same side of an edge-block. The basic move is Z as given in step 4 below.
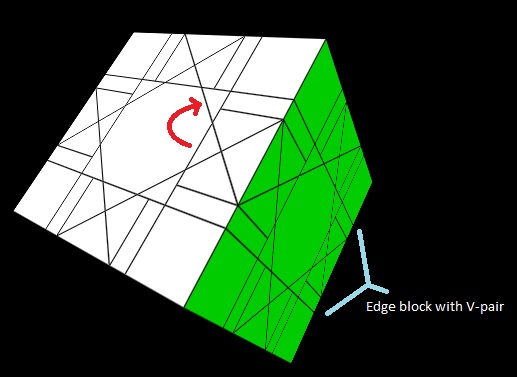
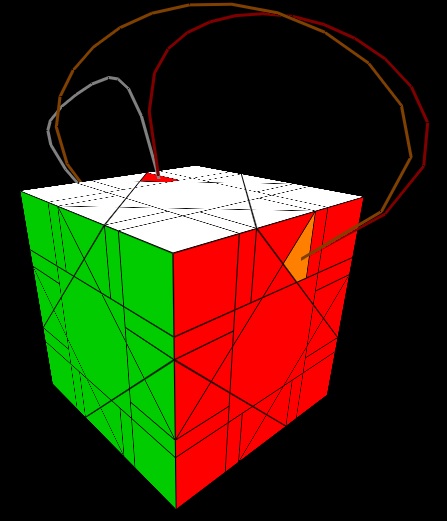
Having an edge block with two mis-oriented slivers on the same side of it, use X=7[2R,(1/2)U,2Ri,(1/2)Ui] to properly orient these slivers when the edge block is placed in the RD edge with the slivers poking out of the R face. (See the diagram in step 3 below.) When two slivers are poking out the same side of an edge block, I often call it a "V-pair."
Note that you can solve 4 such blocks simultaneously by swapping 4 corners with 4 edge-block centers. The sequence is Y=2[2[(1/2)Ri,(F,3[R,U,Ri,Ui],Fi)],(2/3)Ri].
With the puzzle back in perfect cube shape, we're ready to solve the corner triangles up to their proper face, or the face opposite their proper face. It won't matter which face as they'll constantly be flipping back and forth between those two faces during step 4. We'll resolve them once and for all in step 6.
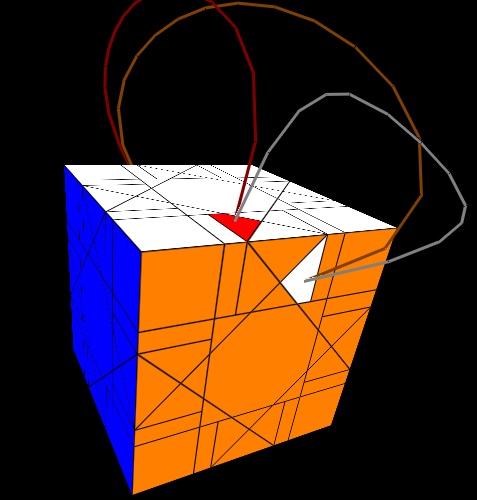
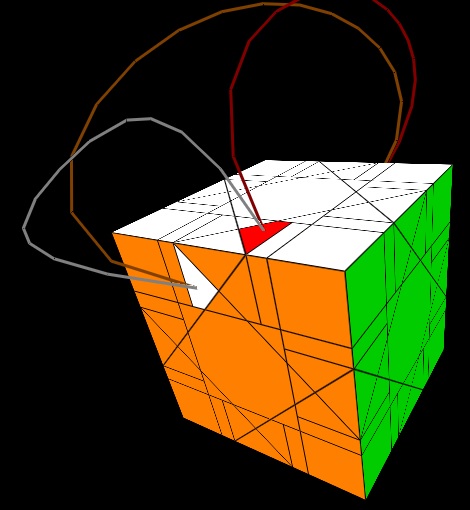
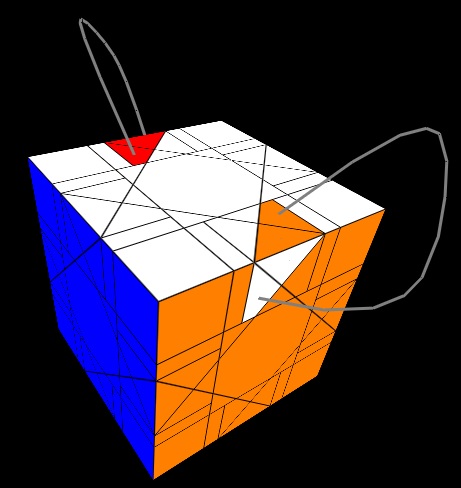
A convenient sequence that permutes corner triangles across adjacent faces is (1/2)Fi,(1/2)Ri,U,(1/2)R,2F,(1/2)Ri,Ui,(1/2)R,(1/2)F and it's clear symmetric varients. This will get much of the job done. For the remainder of corner triangles that can't be solved this way, use the sequence X in step 2 to move the top-facing edge triangle in the RU edge block into the corner triangle position in the RUB corner and top-face. Of course, this will also create a pair of mis-oriented slivers in an edge-block, so you must apply X an even number of times. If an odd number of appliations is needed, move an edge triangle of one color into a corner triangle of the same color. The following diagram indicates the action of X on corner triangles and which slivers become mis-oriented.
Now comes the most time-consuming part. We must solve 10 of the 12 edge blocks. For reasons that will become clear later on, make sure that the last 2 unsolved edge blocks share a common color. We'll solve those 2 remaining edge blocks simultaneously in step 5.
To get the edge blocks solved, you will apply the sequence Z=(1/2){Fi,Bi},2U,(1/2){F,B}, or its obvious varients, over and over again with proper setups; but be assured that this is the only sequence you need for this step no matter how hard things get. All setup moves will be sequences of 90-degree rotations of the faces.
As far as strategy goes, I like to solve edge block centers and the remainder of an edge block sepparately, and then bring them together with W=(1/2)U,Ri,Li,2D,R,L,(1/2)Ui which, not contradicting what I said a moment earlier, is not necessary for this step, but convenient.
Note that nearing 10 of 12 solved edge-blocks, you'll find it necessary to temporarily unsolve a pair of edge-blocks, and then resolve them with another applicatoin of Z.
Surely this is the crux of the puzzle; the part where we solve the remaining 2 edge blocks which, of course, must be done simultaneously. This is also where we're going to find out if we have parity.
Use the sequence Z with proper setups to solve the 4 sliver peices across the 2 edge blocks. Since Z must be applied an even number of times, you may need to swap 2 slivers of the same color-pair.
With the slivers solved, use W to solve the edge pieces across the 2 edge blocks. If they're both oriented properly, we're good to go. If exactly one is mis-oriented, then we have parity! In that case, go to step P below, then revisit this step. If they're both oriented improperly, then you can use W with proper setups to get at least one of them oriented properly.
Assuming we don't have parity, continue to use W to solve all 4 edge triangles across the 2 edge blocks. This is an example of where there being a common color shared between these last 2 edge blocks comes in handy.
With all 4 slivers, all 4 edge triangles, and both edge peices solved across the 2 remaining edge blocks, all that remains are the 8 kites peices. These are solved using a tri-cycle requiring that the 2 edge blocks be setup in the FU and BU edge locations. The tri-cycle is
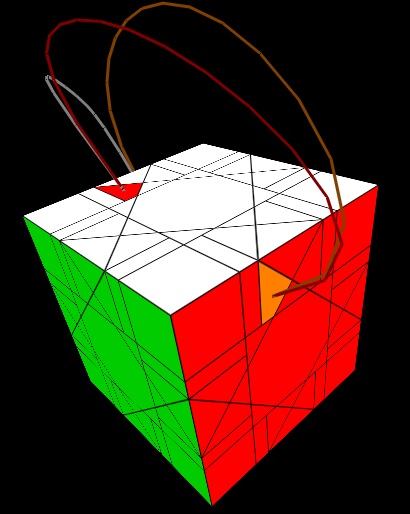
2[2[U,V],Z], where U=F,B,R,L,W,Ri,Li,Fi,Bi and V=Fi,2|F|,(Fi,Ui,F),U,(R,Ui,Ri),2|Fi|,F. The following two diagrams illustrate the action of the tri-cycle.
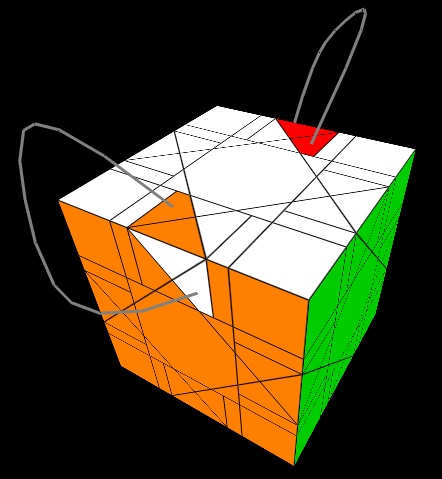
Replacing Z with Zi in the tri-cycle sequence, the action is shifted symmetrically as follows.
Don't forget that you can seemingly swap a pair of kites in a tri-cycle because the last 2 unsolved edge-blocks share a common color.
Note here that 2[U,V],Z,2[Vi,Ui],Zi could also be used, and is a pure kite tri-cycle in the sense that nothing else about the cube is changed by the sequence. We can get away with (and it is easier to remember) 2[2[U,V,]Z], however, because at this step, we do not need to preserve the position and orientation of the other edge blocks or the corner peices; we'll address those in the step 7.
Lastly, I'm going to give here a sequence that, while helpful and convenient in some cases, may not be necessary for this step.
The sequence is 5[Z,U] and its varient 5[Zi,U] which have the following two effects, respectively.
We now solve the corner triangle peices of step 3. This is very easy. We do nothing more than apply Z with proper setups. Note that two corner triangles of the same color may need to be swapped as Z must be applied an even number of times.
Finally, the puzzle now looks like nothing more than a scrambled 3x3, and indeed, that's exactly what it is. Solve it using any 3x3 method of your choice. You should have no trouble doing so. That is, you should not encounter any difficulty that would be created by, say, a single edge being flipped, or a single corner between twisted.
Bask in the glory of having solved the Bagua!
Here we solve the main parity of the Bagua puzzle as we have come to it from step 5. If done right, you'll only need to re-solve 2 edge blocks before returning to step 5, and they solve very quickly.
For the purposes of this discussion, we'll say that red is the color shared by the 2 remaining unsolved edge blocks.
First, get the 2 red edge triangles solved in the 2 remaining unsolved edge blocks, then solve the positions of the 4 red corner triangles in the red face if not already solved. Now move all 4 edge blocks having a red side, solved or not, so that they're oriented correctly and positioned against the red face. Having done this, all 8 red triangles (4 corner triangles and 4 edge triangles) are now positioned properly in the red face along with as much as we have been thus far able to solve in terms of kites and slivers containing red.
Now comes the parity fix! The fix is simply to rotate the red face 45-degrees in either direction, then re-solve up to step 5 without changing the orientation of the red face center, or any other center. To expedite this process, we can use the sequence Y of step 2 in the red face (i.e., R being the red face) to arrive at 4 edge blocks, all containing red and 2 mis-oriented slivers each. Now, if X is used correctly, it can solve these mis-oriented slivers while only doing damage to the 4 said edge blocks. When applying X, put the 4 edge blocks in the RD, RU, BD and BU edge locations. Once the mis-oriented slivers are resolved, 2 of the 4 edge-blocks will solve very quickly if the 4 edge blocks were oriented properly in the setups for X, and then you're back to step 5. Be sure that every application of X moves a red edge triangle to a red corner triangle.